
The buttons on the science program editor main toolbar (see the science program editor overview) have the following functions:
- Open - open another science program from the local database into the current science program editor window. (To open into a new window use the File...Open in New Window menu item).
- Prev / Next - navigate between science programs that are open in the current science program editor window.
- Back / forward - navigate within the current program.
- Cut, Copy and Paste observation elements (the same functions are available in the right-click menu within the science program viewer and from the edit menu item). The Paste feature will insert the contents of the Cut/Copy buffer into all selected observations.
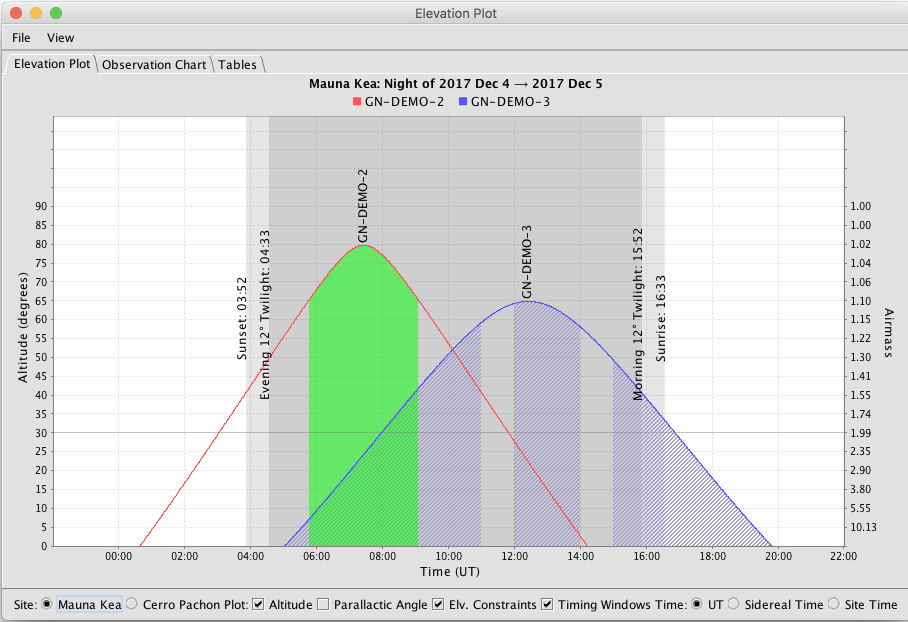
- Plot - plot elevation, airmass, timing constraints, or parallactic angle vs. time for the selected observations. By default the date is the date when the OT was started. The date can be changed by selecting Date from the View menu. If an observation has elevation and hour angle constraints and the Constraints box is checked, then time that matches the constraints is indicated by the filled green area under the curve. If the observation has timing windows then they can be viewed if the Timing Windows checkbox is checked. In this case the timing windows correspond to the
areas under the curve. The dark grey shaded area denotes the time between nautical (12 degree) twilights. The light grey bands indicate the times between sunset/rise and nautical (12 degree) twilights.
- Image - open the position editor graphical display.
- Libraries - automatically fetch (if not already in the local database) and display example libraries for the program in a new window. This will not check for updated versions of libraries that have already been dowloaded. To manually fetch the latest versions of the libraries, select Fetch Libraries... from the File menu.
- Apply - apply 2012B and later template observations to Phase 1 targets and conditions. The templates will be copied and new observations will be created with target and conditions components added for observations of class Science or Acquisition. Calibration observations will be copied but the targets and conditions are not updated.
- Reapply - reapply 2012B and later template observations to exisiting observations that were created using the Apply templates feature. Conditions, targets, and the position angle (PA) are not updated.
- Conflict - cycle through any unresolved conflicts. See the Conflict section for more information.
- Sync - synchronize your program with the Gemini Observing Database. The button will have different appearances based on the status of your program:

Your program is in sync with the Gemini database. You may click this button to check for remote changes. 
You have made local changes to your program to which have not yet been uploaded to Gemini. Click this button to upload them now. 
There are changes to your program in the Gemini Database which have not been downloaded. Click this button to download them. 
Your program has changed in the Gemini Observing Database and you have made local changes to your local program. Click this button to download the changes from Gemini and to upload your changes. Note that merging changes may result in a conflict. 
The current program does not exist in the Gemini Database. 
The Gemini Observing Database could not be reached. You may click this button to try to reestablish a connection.
Resolving conflicts
Conflicts may arise when you synchronize your program if:
- another user has made conflicting changes since you last synchronized with the Gemini Observing Database
- the Phase-2 Status has changed since you last synchronized and your change is no longer permitted
If you encounter a conflict you will get this pop-up message which gives you two choices:
|
1. "Accept All Remote" will forget about any changes that you have just made and accept all the incoming changes from the Gemini Observing Database. 2. "Cancel and Review" will allow you to review the conflicts and retain any changes that you have made. |
 |
| The Conflict panel on the right will describe the conflict and how it can be resolved. In the example to the right you may use the button labeled "Display local version" to switch between the two versions in order to decide which you prefer. Pressing the "Keep displayed version" button will mark this conflict as resolved. Clicking the "Conflict" button in the upper right will take you to the next conflict, if any. When all the conflicts have been resolved you may synchronize with the Gemini Observing Database. |  |
| In the case where it is possible to toggle between the two different versions the conflicting elements will be marked by red "C" icons, as shown to the right. The Conflict button in the upper right may be used to navigate between the different conflicts. |  |
If the local and remote versions of an observation cannot be automatically merged (and the conflict distilled down to a single component as in the example above) then the local copy of the conflicting observation will be put into a "Conflict" folder so that you may keep your changes if you desire. Selecting the Conflict folder will show the message below. If you click this button it will delete all your changes since your last synchronization with the Gemini Observing Database. If you prefer to review each of the conflicts click on the Conflict button at the top right to navigate to the next conflict.

| An example Conflict folder is shown at the right. It contains the local observation which could not be merged with the observation in the Gemini Observing Database. This is done so that the local changes are not accidentally overwritten. If you want to retain your modifications you may drag the observation out of the Conflict folder. |  |
| When you click on an observation in the Conflict folder the panel at the right will describe where the observation came from. In this case the observation is the local copy of Observation 5 in the Gemini Observing Database. |  |
| Another example of a conflict which cannot be automatically merged is where one user makes a change to an observation and another user deletes the same observation. The OT will put the deleted observation into the Conflict folder so that you may decide whether to delete it. If you want to save it just drag the observation out of the Conflict folder. |  |