Beside all command options such as add new program elements, cut, copy and paste program elements, the menu bar offers the capability to Loading and Saving Programs. It is also from the menu bar that we can access the Keychain Manager.
Loading and Saving Programs
New for 2015A:Science programs may reside in three locations: (a) in the Gemini Observing Database, (b) in a local database on your hard disk or (c) in an export file on your hard disk. Retrieval and storage of programs from these locations, and the important differences between them, are described below.
(a) Retrieval and Storage from the Gemini Observing Database
Phase I proposals that have been approved by the ITAC and Gemini Director will be translated into the Observing Tool "Science Program" format and stored in a database at the Observatory. Soon after notification of a successful proposal you will receive a password and database access instructions. As the first step you should check out an authentication key with the Key Manager. Once you have an active key, bring up the Open Program dialog by clicking the Open button on the startup screen or main toolbar of the scence program editor. You can also select the File...Open menu item.
The Open Program dialog gives a list of all programs in the local database and program in the remote database that you have access to with the active key. Programs in the local database have a black font. Available programs in the database are displayed with a gray font. The key and site are given in the window title bar and in the Key selection menu. The Key menu allows you to quickly change the active key. You may limit the programs being displayed with the checkboxes for remote programs, program type (e.g. queue (Q/DD/SV) or classical (C)), and with the semester selection menu.
The Remote checkbox toggles the display of programs in the ODB appropriate for the active key. If you are only working on programs in your local database, then unchecking this box will significantly speed up the display of the program list.
New for 2018B: It is now possible to highlight multiple rows in the table using Shift or Control/Command + mouse click selections. Then you can open, delete, or revert all the selected programs. There are restrictions on how many programs can be downloaded at once. The new Revert option will delete the local copy and then download the version from the ODB.
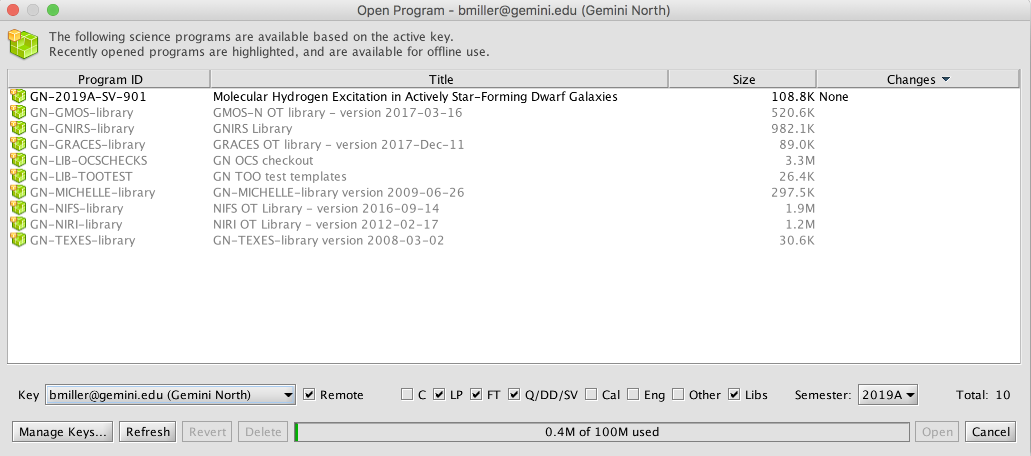
Download programs by either double-clicking on the row for the program or highlighting multiple rows and then clicking Open.
The Manage Keys button will open the Key Manager.
The Refresh button will refresh the program list from the observing database.
After completion of Phase II observation definition you should set the appropriate observation's status flags and upload your program back into the database using the Sync command.
(b) Saving, Loading, Deleting, and Reverting Program in the Local Database
Science programs that are imported from XML files or retrieved from the Gemini databases are stored in a local database on your hard disk. Whenever a change is made to a science program (e.g. editing an observation details), the modified program is automatically saved to the local database.
You can open science programs from the local database, either into the current or a new science program editor, and delete programs in the database from the Open Program dialog described above. Recall, local programs are displayed with a dark font.
The bar along the bottom of the Open Program dialog gives an indication of the amount of memory used by the local database. Fifty megabytes is a recommended limit but more can be used. You may start to see some performance degradation if the local database is larger than this amount.
To delete a local program bring up the Open Progam dialog, select one or more local programs and then click Delete. You will be prompted for confirmation. If the program exisits in the observing database, then you can always download it again. If the program is only in the local database, then deleting is permanent unless you have a XML backup copy (see below).
To revert a program to the version stored in the ODB, select one or more local programs and then click Revert. This is a good way of deleting any unwanted local changes and restoring the version from the database. This can also be done for the program being displayed in the Science Program Viewer by selecting Revert Changes... from the File menu.
The local database is stored on your hard disk. For OT 2013B and earlier under Windows XP and 7 the .jsky folder is stored in C:\Document and Settings\[user name]. Under Solaris, Mac OS X, and Linux the path is [home directory]/.jsky/spdb. For the 2014A and latter OTs the local database is stored in [home directory]/.ocs15/[OT version]/data/edu.gemini.pot/spdb. These are binary files and cannot be edited. If you have unwanted multiple copies you can delete these files directly (or move them to a different directory).
![]() Note the binary spdb files cannot be transferred directly into a new version of the OT. If you would like to (re-)use previous science programs in a new OT release you should first export the database into XML format as described below.
Note the binary spdb files cannot be transferred directly into a new version of the OT. If you would like to (re-)use previous science programs in a new OT release you should first export the database into XML format as described below.
(c) Importing and Exporting XML files
Science programs can be written to disk as XML files e.g. for communicating with Co-Is and safe-keeping. These eXtensible Markup Language files consisting of ASCII tags and values. The file structure is complex and therefore it is not advisable to edit the XML directly.
You can save and load XML files from the File...Import/Export XML menu items. Each imported XML file is stored as a separate science program in the local database. If a science program with the same program reference number already exists you will be prompted to cancel the file load or continue. In the latter case a temporary program reference number with format <program id>-copy<n> is assigned.
If the imported program exists in one of the observing databases then you can sync with the database by clicking the Sync button. You will be prompted for the site to connect with and then the OT will attempt to sync the program with the program with the same program id in the database. You will probaby get a significant number of sync conflicts that you will have to resolve. Therefore, if a program is in one of the databases then we recommend that you download a fresh copy of the program rather than sync with an old version imported from the XML backup.
You can import and export an entire directory of XML files with one action. This is useful if you wish to transfer files into a new version of the Observing Tool because the binary files in the local database cannot be transferred directly. For the 2014A OT we recommend that you do not import a large number of programs into the local database as it will significantly increase the launch time of the application.
As the Observing Tool is under active development it cannot be assured that future versions will be backwards compatible with the current XML format.
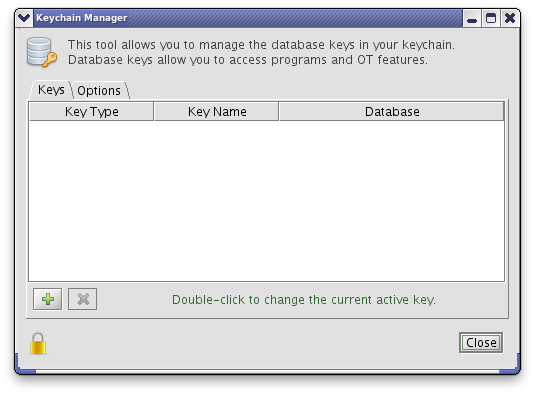
Keychain Manager
Access to the Gemini Observing Databases (ODBs) is controlled by requesting authenication keys for each instance of the OT that you use. Once an OT has a key it does not need to be entered again unless the key is deleted or reset or the OT is updated. Keys are managed with the Keychain Manager that is accessed from the "Manage Keys..." button OT on the welcome screen and the Open Program dialog or by selecting Edit...Manage Keys... in the Science Program Editor.
Click the Add button (![]() ) to request a new key. This brings up the request dialog.
) to request a new key. This brings up the request dialog.
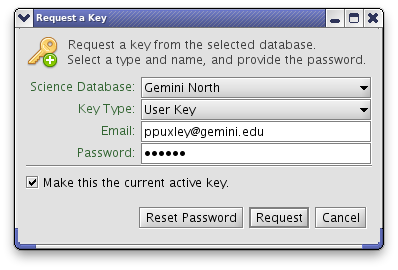
First, select the database (site) that you want to access. Then, select the key type.
User Keys
The recommended key type is the User Key. This is based on an email address and provides access to all programs that include that address. Select "User Key" from the Key Type menu and then enter your email address in the Email box. If this is your first time requesting a key or you need to reset your key, then click the "Reset Password" button. An email with the password will be sent to the email address.
Once you've received your password, copy/paste it into the Password box and click the "Request" button. If there is an error, then a popup with information will appear, otherwise the key will be entered into the key list. If you don't want the new key to be the current active key (see below), then uncheck the box labeled "Make this the current active key" before clicking "Request."
If your email address changes or you need to add a collaborator's email, then please submit a HelpDesk ticket and your contact scientist will update the PI/PC email contact field in your program.
Program Keys
It is also possible to request a program key that gives access to one program. This is similar to using the program password in the 2013B and earlier OTs, and the old program passwords are valid for requesting program keys. To request a program key, first select "Program Key" from the Key Type menu, enter the program id and the password sent to you in the program notification email, and click the "Request" button.

Note that the program key passwords are still required in order to access and download your data from the Gemini Observatory Archive.
Visitor Keys
A visitor key will be provided to each classical or priority visitor observer. This will give these users the ability to queue and execute their program.
Partner and Staff Keys
The Partner and Staff key types are used by NGO and Gemini staff and give the access needed for program checking and observing.
Managing Keys
You may request as many keys as are needed. All keys will be listed in the Keychain Manager.
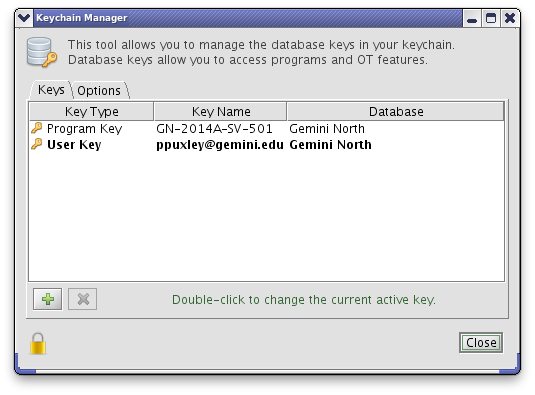
Only one key can be active at a time. The active key is displayed with a bold font. Also, the active key and site are shown in the window title bar in the Science Program Editor and the Open Program dialog. You make a key active by double-clicking on the row for the key in the Keys table.
Note that when updating (replacing) a key it should be possible to just add the new key, but if this doesn't work it may be necessary to delete the old key first. If you still have trouble, reset the keychain and then add the new key.
To delete a key, select (single click) on the row for the key and then press the Remove button (![]() ).
).
Keychain Options
The Options tab of the Keychain Manager allows you to set a keychain password and reset the keychain.
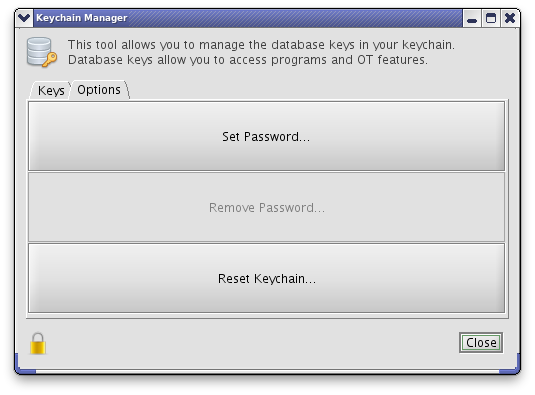
Set Password allows you to set a password that must be entered in order to use keys and every time that you launch the OT. When the keychain is locked the active key is disabled and the OT will not be able to communicate with the ODBs.
Remove Password will remove the keychain lock password.
Reset Keychain will delete all the keys in the keychain.
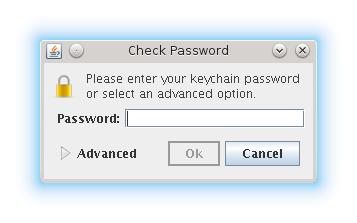
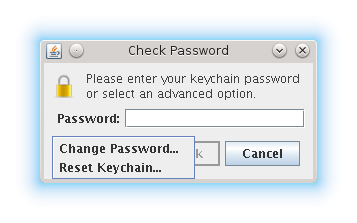
Once a keychain password has been set, a password dialog will appear when the OT is first started requesting the keychain password (below left). The "Advanced" options (below right) allow changing the keychain password or resetting the keychain. Resetting the keychain will remove the password and all keys.